Thursday, March 27, 2014

Grey Dey Thursdey #23....

Happy Grey Dey Thursdey Mes Amies!

Today, I’m sharing my "mood board" for my master bedroom makeover...


...I've made some "additions" to it as this project unfolds....


~*~*~*~*~*~*~*~*~*~*~*~*~*~*~*~*~*~*~*
Now For The Party... 
(I would appreciate it if you would kindly add this button to your sidebar)

A few simple rules so that we all enjoy this weekly gathering....

1.  You don't need to be a "follower" to participate. ALL are welcome!

2. Post anything in grey or "shades" of grey  (I would hate to have to delete your Post so kindly respect this rule. "Merci")

3. If it's not something you've created or own, then please give credit to its' original source.

4. Kindly link back
to this post or place the blog button on your sidebar with a direct link.  

Let's add a little "grey to our deys!"
"Merci" for joining in.....


Friday, March 14, 2014

DIY Simple Seat Cover Tutorial...


The makeover in the "Master" continues....
Here's a simple seat cover tutorial...
it’s similar to the DIY post of my painted seat covers ....

"Before"


"After"


Materials
Paint: I used an interior latex paint in a satin finish: Bone White by Ben Moore
~Fabric: "Damask Grey" exclusively for JoAnn Fabric

~ Screwdriver 
~ Scissors
~ Measuring tape
~ Staple gun (or hot glue gun)

Remove the seat from its' frame.....


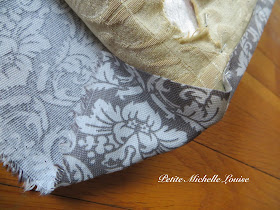
Start by laying your seat on your fabric and cut at least a 4” border all around it.

Make sure the “right side” of your seat and the ”wrong side” of your fabric are facing each other before you adhere the fabric to the seat. 


I used a small staple gun for this project but a glue gun will do the job just as well.
Start by folding one edge of fabric over and stapling it to the wood. It helps to lay your seat on a hard surface and use firm, even pressure as you staple.


I staple every 3 inches or so. Next, staple the opposite side of the seat and be sure to pull your fabric “taught” before stapling.

Now you’re ready for the other 2 “sides” of the seat and your “corner folds.” 

Fold the fabric as you would when wrapping a present. Staple where you would normally use “tape.” Repeat this step for all 4 corners of your seat. 


"After"


I'm making progress and will be sharing a 
"How To Make Your Own Bedskirt" tutorial and also some of my painted furniture pieces real soon. 
In the meantime...Happy Weekend Mes Amies!


Wednesday, March 12, 2014

Grey Dey Thursdey #23....

Happy Grey Dey Thursdey Mes Amies! 

Today, I'm sharing these lovely earrings that I got for myself this past week. 
(hey...my  birthday's coming up so I'm entitled)

...they're from a collection called: "Devotion" and I found them at a store called "Brighton" in Boston...

...you can also find the entire collection on this website HERE.
...I have my eye on the necklace to match and a bracelet as well. I just adore this collection.

~*~Disclaimer: I am not being offered any compensation from Brighton to promote this jewelry. I just happen to think it's lovely and wanted to share~*~

~*~*~*~*~*~*~*~*~*~*~*~*~*~*~*~*~*~*~*
Now For The Party...

(I would appreciate it if you would kindly add this button to your sidebar)

A few simple rules so that we all enjoy this weekly gathering....

1.  You don't need to be a "follower" to participate. ALL are welcome!

2. Post anything in grey or "shades" of grey  (I would hate to have to delete your Post so kindly respect this rule. "Merci")

3. If it's not something you've created or own, then please give credit to its' original source.

4. Kindly link back
to this post or place the blog button on your sidebar with a direct link.  

Let's add a little "grey to our deys!"
"Merci" for joining in...


Monday, March 10, 2014

Chair Makeover...DIY Tutorial...

I’ve been busy working on a Master Bedroom makeover. It is badly in need of some TLC, as you will see when I finally share some “before and afters” of the entire space after this project is completed. For now, I am sharing a small makeover of 2 chairs we have in the room. 

Before

I used bleached Painters Drop Cloths to cover the seats of these chairs 
(for a tutorial on how to bleach and soften drop cloth, go HERE)

Start by laying your seat on your fabric and cut at least a 4” border all around it.

Make sure the “right side” of your seat and the ”wrong side” of your fabric are facing each other before you adhere the fabric to the seat. 

I used a small staple gun for this project but a glue gun will do the job just as well.
Start by folding one edge of fabric over and stapling it to the wood. It helps to lay your seat on a hard surface and use firm, even pressure as you staple. I staple every 3 inches or so. Next, staple the opposite side of the seat and be sure to pull your fabric “taught” before stapling.


Now you’re ready for the other 2 “sides” of the seat and your “corner folds.” Fold the fabric over and cut a small portion of the fabric out. It can be a bit “bulky” otherwise. 


Now fold the fabric as you would when wrapping a present. Staple where you would normally use “tape.” Repeat this step for all 4 corners of your seat. 


 I decided to paint & hand stencil a design onto my seat cushion but there are many “transfer methods” out there if you choose to transfer an existing image. 
The Graphics Fairy has an unlimited array of gorgeous images and tutorials on how to transfer to fabric so please check her out!

~*~ Painted Seat Cushion Tutorial~*~

Materials


~ Paint: I used an interior latex paint in a satin finish: "Cathedral  Stone" by Valspar
~ Foam brush: 1”
~ Masking Tape
~ Stencil: This one is made by “Stencil Ease”  found at A.C. Moore


 I wanted to give my seat cushion a French Grain Sack look. 
First, I decided the width I wanted for my “middle line”, which would be the largest of all the lines (1” w). I then measured the width of my seat, found the center point  and used masking tape to tape off my line.


~*~Be sure to press the tape firmly onto the fabric so the paint does not “bleed” under it while you are painting.

Time to paint! I
 used a small foam brush. Dip the brush into the paint and “blot” on several sheets of paper towel.
 ~*~You can always go back and make your line darker  but you can't go back and make it lighter...right?  


Let dry completely and pull off your tape. 


For the next lines, I decided on the “width” (1/4”)  and then measured, taped and painted  as I did for my first line. 


I loved the way the cushion looked with just the painted lines but wanted to add a simple embellishment so I decided on a French-inspired stencil. I think a number or monogram would look lovely as well. 


I taped my stencil onto the fabric and used the foam brush to fill it in.
~*~Again...use light paint on your brush and go over it if you prefer a darker pattern. Let dry and remove stencil.


 Ouila!


And here are some “afters”...


~ I painted the chair in “Bone White” 
by Ben Moore ~

Do “stay tuned” as I will be sharing more DIY projects from my “Master Makeover.”


(Hey LoMo...if you're reading this, I hope you’re feeling  better! ;)